|
Ok, not the old movie with Jim Carrey....... There are a lot of cables on a 356. Probably the reader quickly thinks of the clutch cable, but here is a list of the ones I am working on.
This weekend I replaced the cable to the rear decklid. I had previously removed and lubricated it, but when I reinstalled it, the cable broke at the end right where is passes through the latch. It's important to know that is a rubbing point and also the point where there is stress when the cable is pulled. I cleaned and lubed the engine lid latch months ago, and it works great. I made a small extension to use until this weekend I replaced the cable with a new one. Installed it with a nice lube as I put it into place. Here is where it gets interesting.... The cable sold for the engine lid release is the same one as used for the hood release. In my case engine deck lid cable broke only about 2 inches from the end, and was in great shape otherwise. Here is the surprise, the cable length to the rear engine lid is LONGER than the length to the front hood latch. Hmmmm..... I did not want to have the cable break for my front hood latch, so I removed the latch and gave it a serious cleaning. It sure was full of dirt and grime. Came out great after soaking and cleaning with a soft brush. Photos are below. Then, to avoid the issue of the front hood cable breaking at the point of attachment to the latch (like the engine deck lid cable did), I simply used the old engine deck lid cable for the front hood cable. Even though it had lost about 2 inches when it broke, I still had to cut another couple of inches off of it to use for the front hood latch. Again, the cable was in fantastic shape, so I lubricated it and installed it with full confidence. After cleaning the latch it was lubricated as well. Both front and rear cables operate very smoothly now, plus I have a spare cable I could use if I need to cut it down for the fuel door. Photos below.  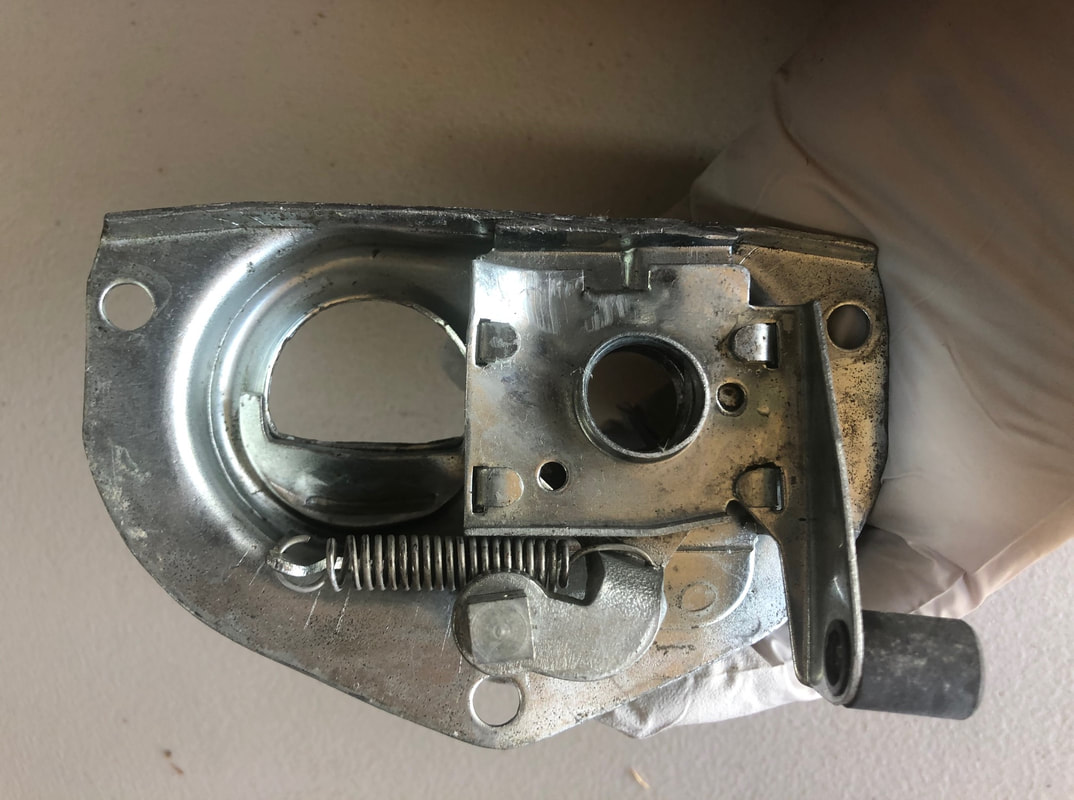  There are brass fittings and screws on a 356. Perhaps more on the earlier cars, but even on the 356 C cars, there are brass screws in the Zenith carburetors, and brass fittings on the brake lines. But, there is at least one more spot... The straight slot screw that goes into the fastener where the rear deck lid cable folds back is, yes indeed, brass. Of course I had to polish mine! 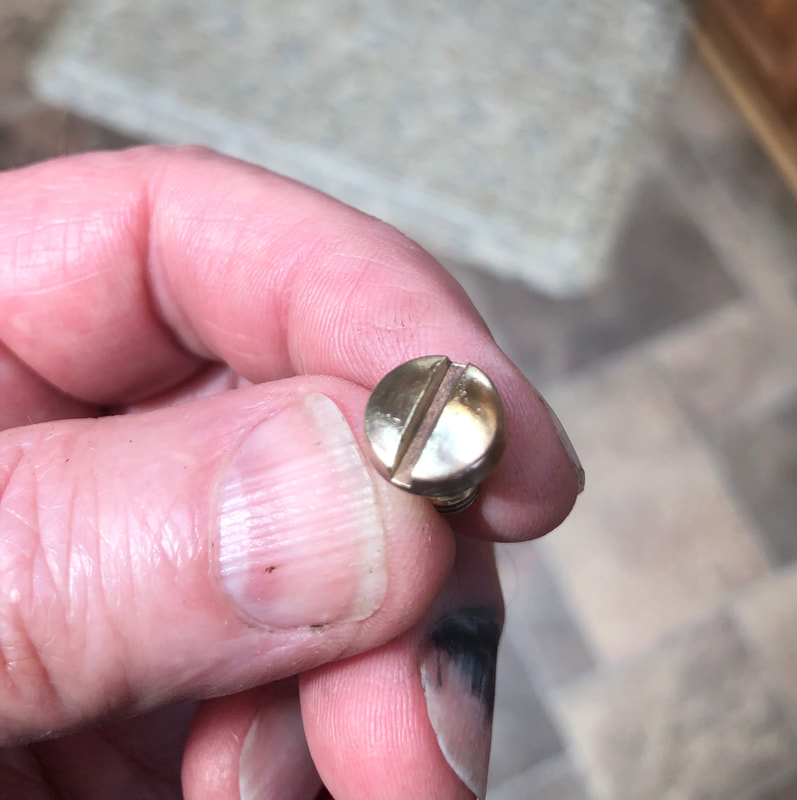
0 Comments
Original fuel line on T-6 Porsches had a blue plastic tracer in the braided cloth. Many of us have found samples of this that remained unchanged for decades under the floor mat at the front of the tunnel. It was used in that location, but also on the engine, the gas tank overfill line (T-6) and connecting the brake fluid reservoir to the line feeding the master cylinder. Some attempts have been made to replicate this plastic lacing, but none were made with the same materials as original. Today you could buy fuel line that is woven nylon over the rubber fuel hose, and the blue tracer line is made up of several thin strands of nylon threads (not a solid lace). The fuel line is shinny black, the color of the tracer is the wrong color, and it is obviously not a solid plastic lacing, but threads. So the problem is that the original lines are old and unsafe, not fit for modern fuels, and a replacement fuel line can be had in braided cloth, but without the blue tracer. This is what a large percentage of 356 owners are installing today. So, what is an originality freak to do???? I had my own line made up with the proper materials of course!!!!!!! I pulled the blue plastic lacing from an original fuel line and examined the back side to get a good color match. Originally the blue was lighter than the dirty appearance the 50+ year old stuff looks now. Very happy I found a good match. Results are below. This first photo is the original fuel line that was used on the gas tank vent line. I decided to reuse this piece since it is in nice shape and normally not a "wetted" part. 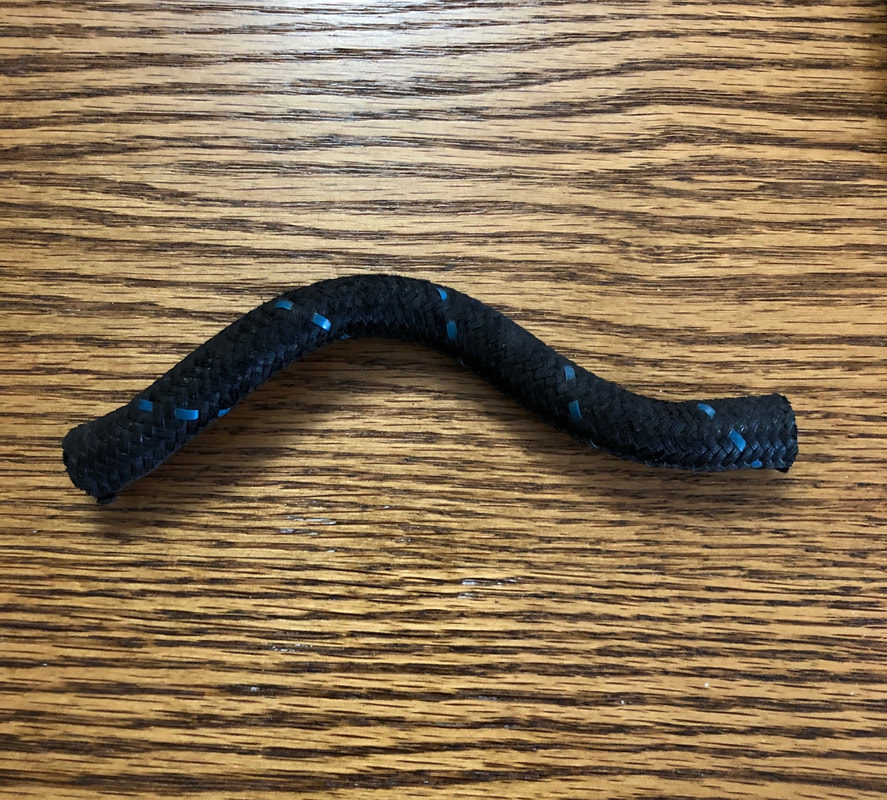 Here it is installed. 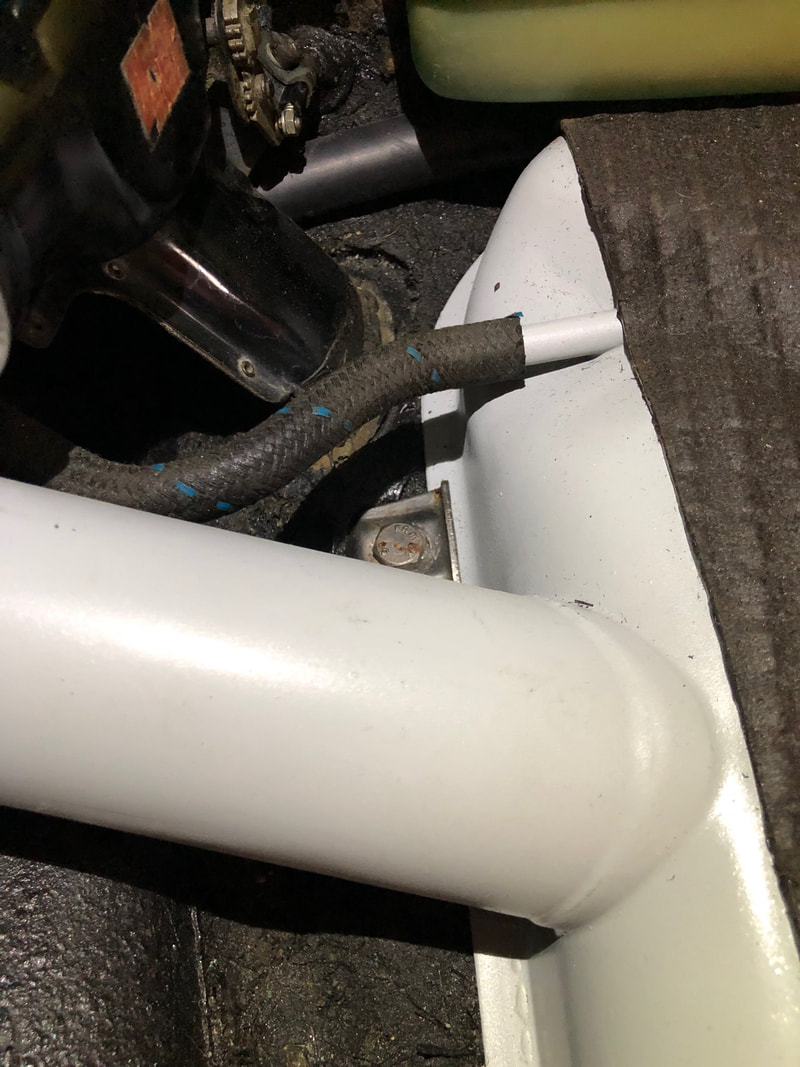 Another shot of used/original line. This one is so dirty is still has spider webs on it. That makes the blue plastic tracer line look darker than it did originally. 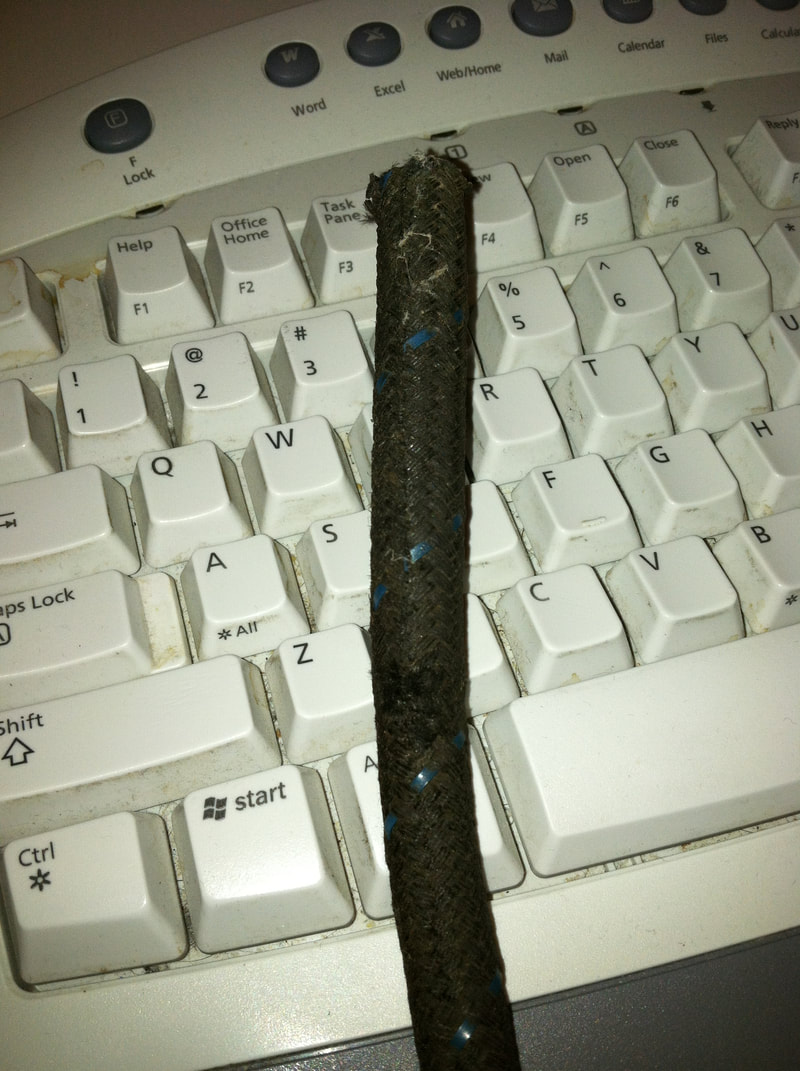 Here is a somewhat blurry photo of the nylon version of replacement lines. Again, the material is nylon instead of cloth, and nylon threads instead of solid blue plastic lace. In the photo below, it doesn't look to bad, but in person, it is very obvious that the braiding is done with groups of nylon threads, not cloth. A few years ago I bought some not knowing it was made this way. I tossed it out when it arrived. 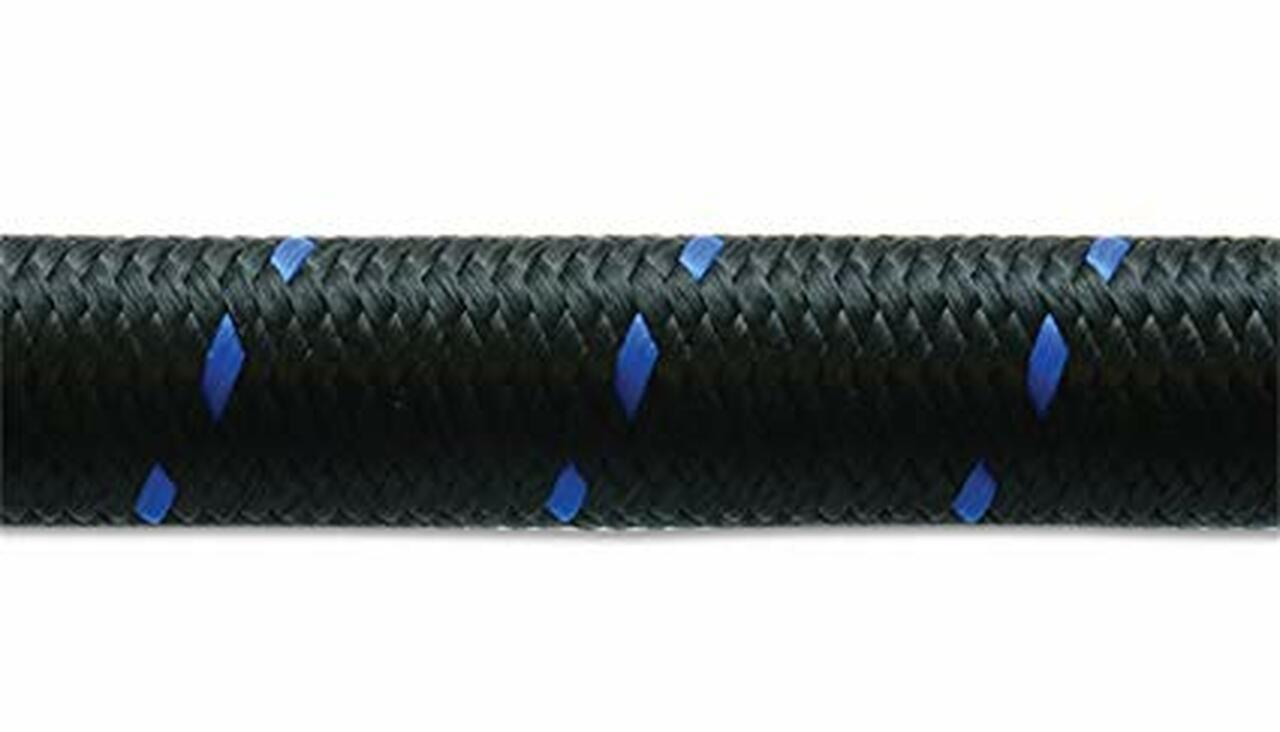 And now,,,, here is the line I made up! Cloth wrapped with a solid blue plastic tracer as original! 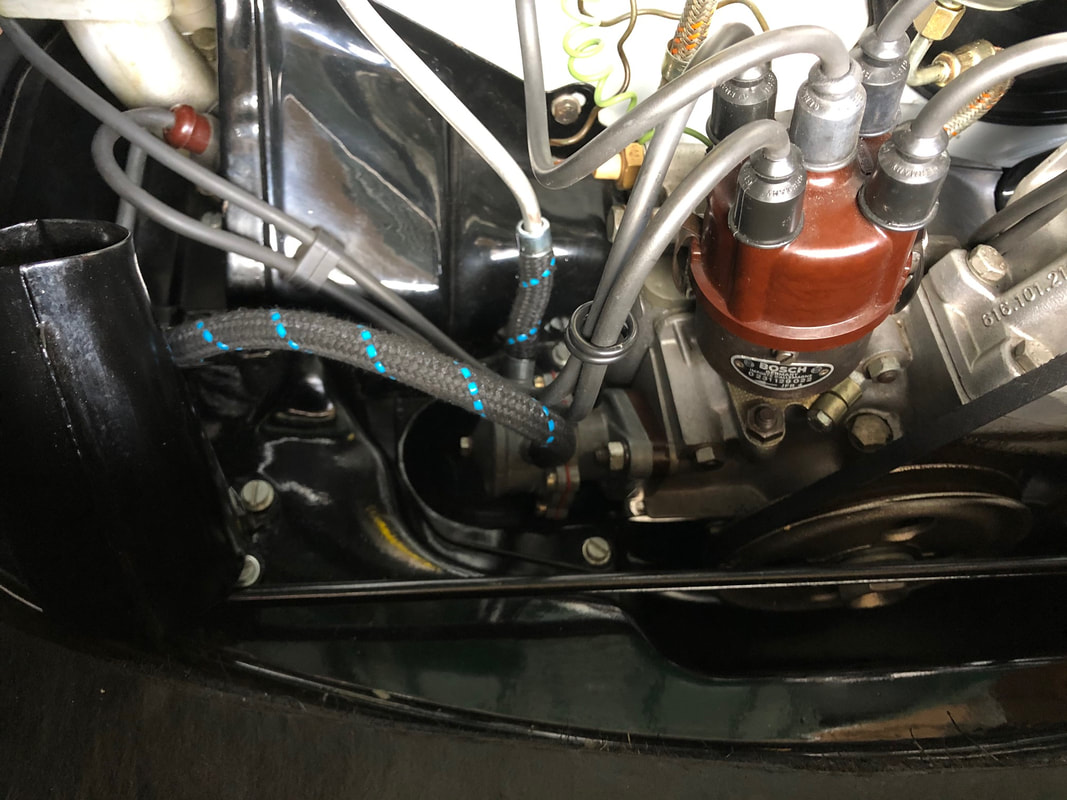 A couple of years ago I posted about installing the rear bump stops in Miss April as well as some Boge shocks on the rear of the car. Well, I have finally completed the task of cleaning up all the shocks and steering damper. Boge was the standard shock installed on the 356's unless the buyer specified Koni from the options list. Since there is no mention of shocks on my Kardex, it's a good bet that Boge were on the car when it left the factory. Below are photos of my Boge shocks and steering damper. I have done my best to restore them to original and I'm happy with how they turned out. They still have nice smooth movement in either direction. The mahogany/brown color is the original color for these shocks. They changed to a black color around the same time that the Berlin wall fell, and the shocks were then marked "MADE IN GERMANY" replacing the wording "MADE IN WESTERN GERMANY". Also note the original Boge logo on all the shocks and the steering damper. That was not used in later production and the word BOGE was later stamped in individual blocks. Enjoy the photos! 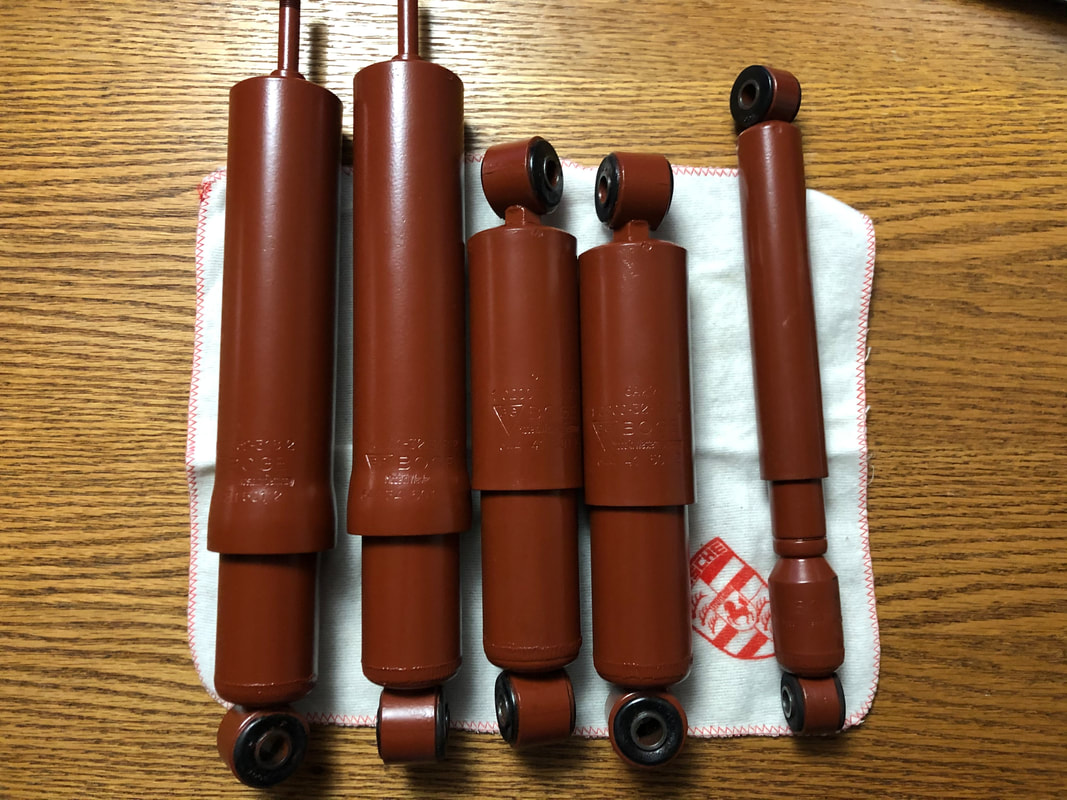 Close up on the Rear Shocks. Note the PORSCHE 644 part number. 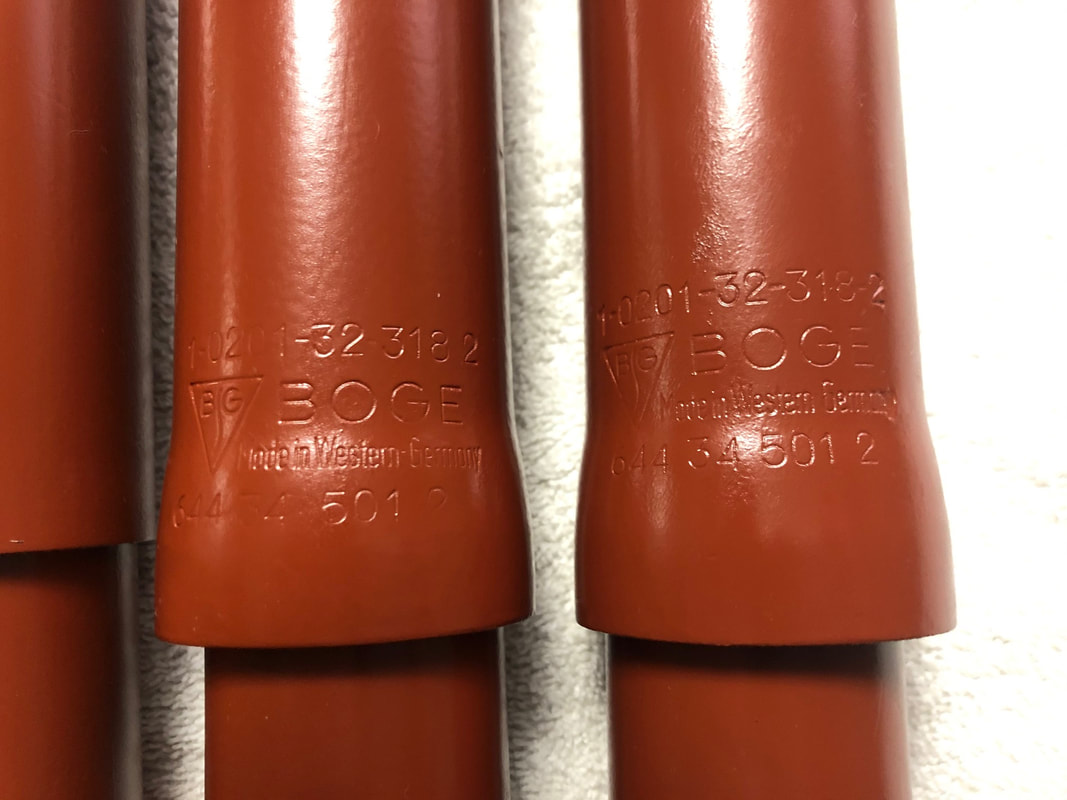 Close up on the front shocks. PORSCHE part numbers on these as well.  Harder to get photos on the steering damper because the diameter of the tube is so small. Including 3 shots. Again, the PORSCHE part number is present this time starting with 695. 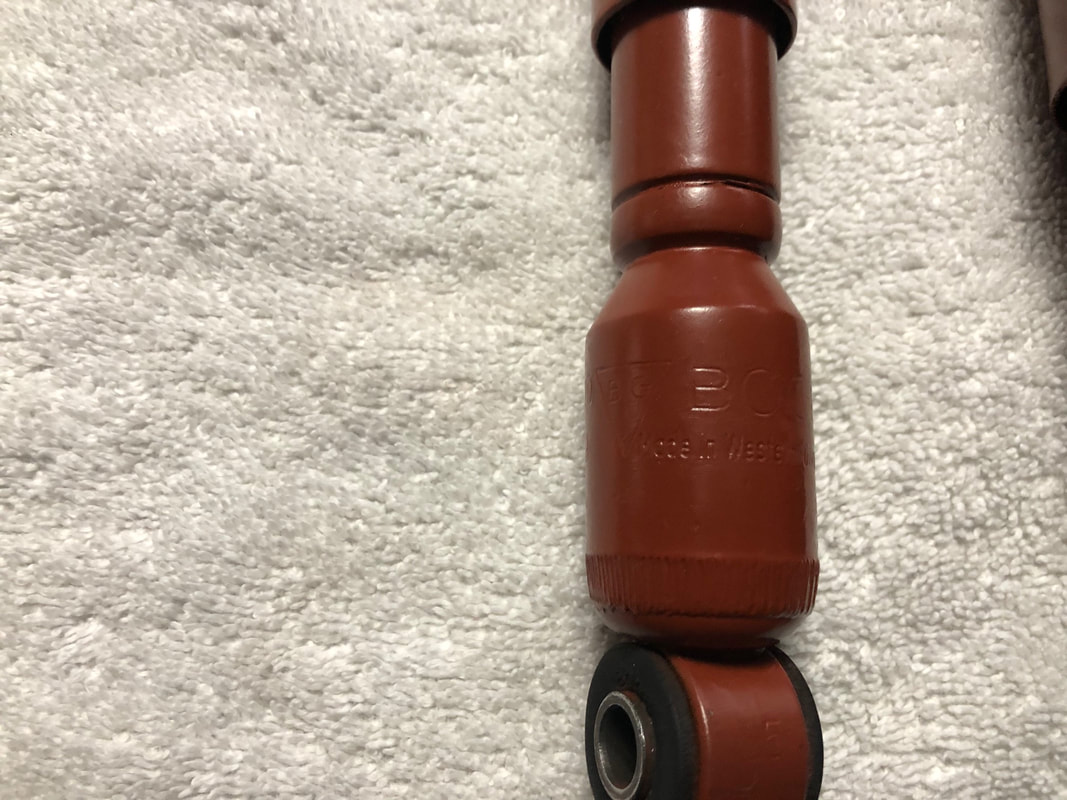 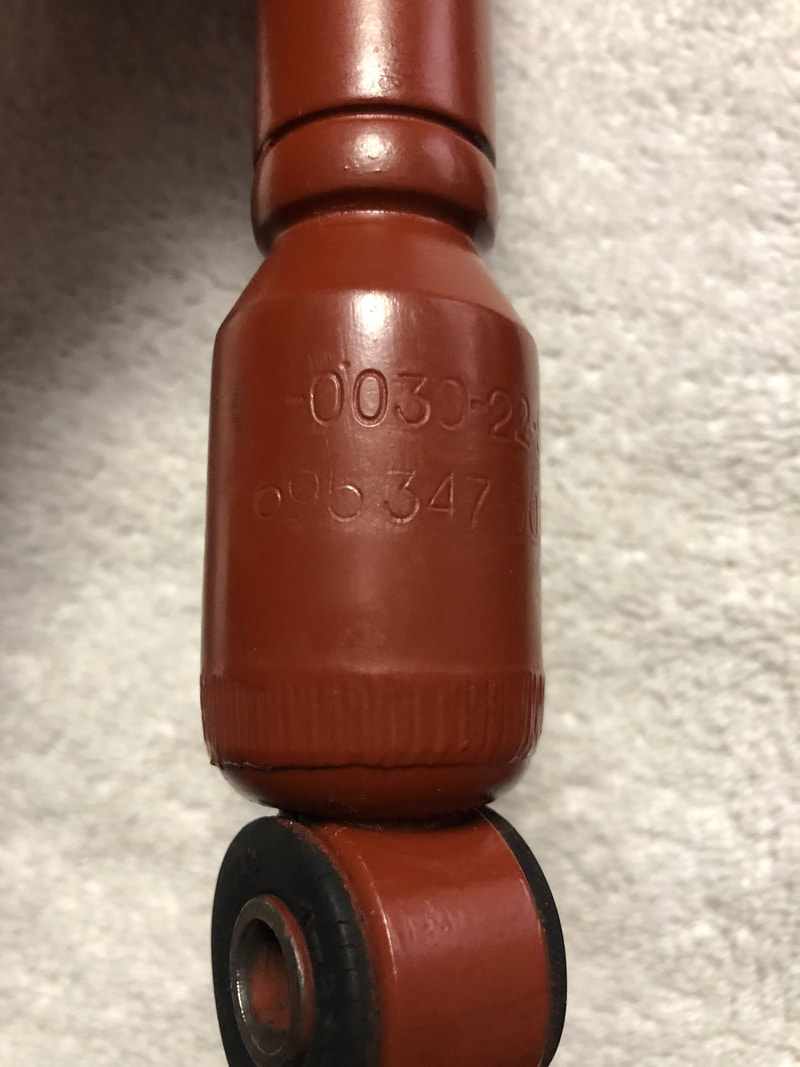 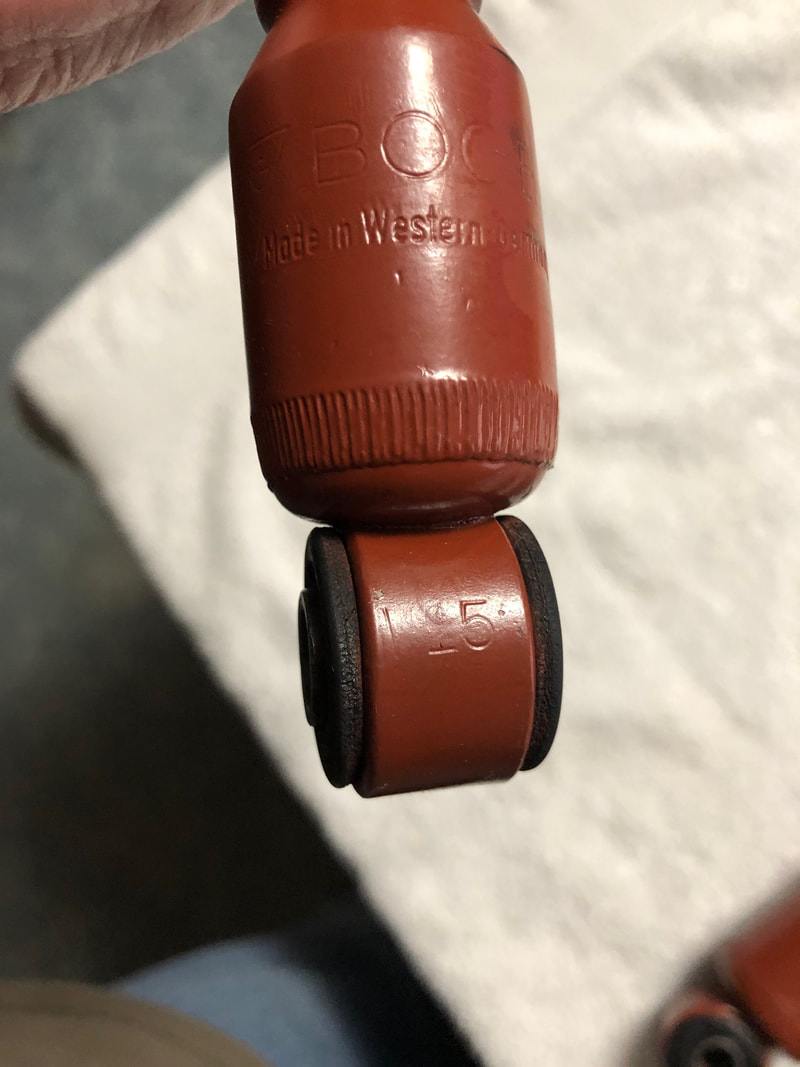 I have a modest collection of PORSCHE automobilia. It's a fun hobby that I enjoy. Today I added a "Flip File" of an incredible collection that was auctioned off a while ago. The collection takes up 169 pages!
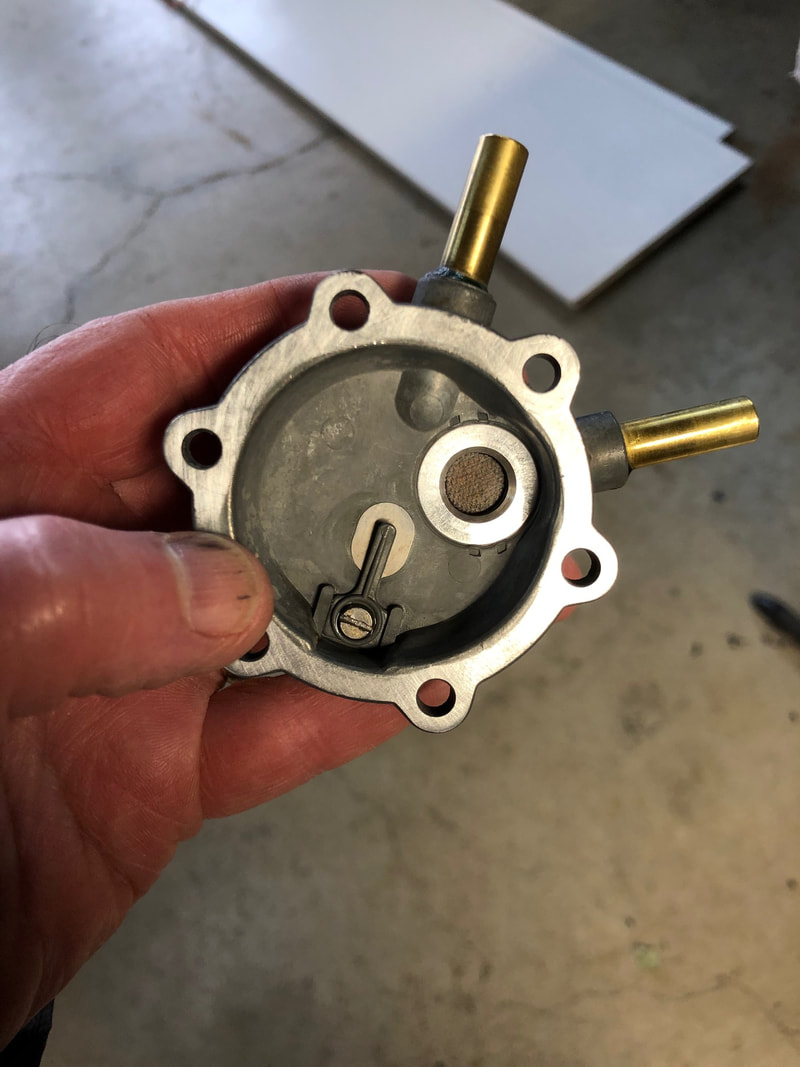
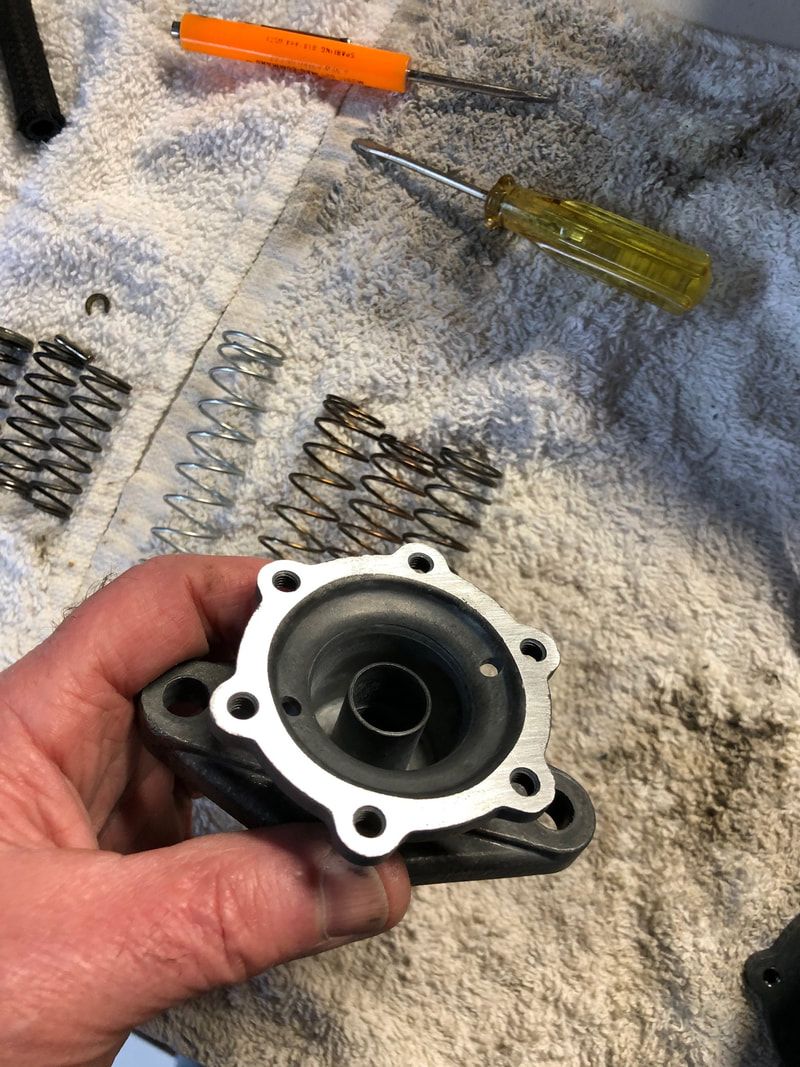
To view this amazing collection go to the Misc Section of my website. It is at the bottom of the page. MAKE sure to click on the FULL Screen icon [ ] in the bottom right of the tray. Enjoy! I always strive to do a complete and through job when working on Miss April, but on occasion a component will require me to revisit the restoration of the part. This is definitely the case with my fuel pump. The Saga- About 4 years ago was the first time I opened it up, and it looked great in inside. This was really just an inspection to see if any junk had made it from the fuel tank through the fuel selector valve and then gotten caught by the little screen in the pump. I had completely restored the fuel tank and also completely restored the fuel selector valve, so opening it up was just for inspection and cleaning. Car ran great. Phase Two- The pump developed a small leak at the brass inlet tube on the upper half of the pump. I was able to remove the pump and make a good repair using green wicking Lock-tite. Once reinstalled, the leak was gone and Miss April ran great just like before this repair. We put on a few hundred miles, some of it very spirited driving at the West Coast Holiday (80 mph). Phase Three- Car continued to run very well, rowing through all gears and pulling strong. However,,,, If I left the car at high rev's, around 4k, and held it there for a long time, eventually the car would sputter just a little. If I backed off, the car would run great again. I could take the rev's all the way up as high as I dare, and it would run fine. It only sputtered a little if I held the rev's up for a long time. Seemed the float level was going down and finally one carb would stumble because of low level. Having checked the float levels several times, it seemed fuel supply was the issue. On this third attempt, I wanted to do everything possible that could be done to the fuel pump, but first I wanted to diagnose if it had a problem. One problem to check out was the "check valve" on the outlet of the pump. This check valve keeps flow from going backwards when the diaphragm is going down. It prevents backflow, which if there is any backflow, the net result is both lower pressure and lower flow to the carbs. I decided to take the pump apart, clean thoroughly, and then submerge the pump in water, blowing back towards the pump while connected to the outlet pipe. Below is the result of this first test- The above shows the check valve was not sealing. The check valve is difficult to remove, requiring drilling to remove the 4 small spots where the valve was "staked" into place. I decided to avoid this and seriously cleaned everything first. I folded over some very light sandpaper and gently went around the interface of the disk to seat. I followed that with lots of simple green spray, and then a soak in mineral spirits. Lastly I used compressed air from both directions. Then it was time to test again. Same test... Yahoo! Tight shutoff! Next step was to make sure the mating flange surfaces of the body were flat. I used a fine flat faced file to get close, then finished the surfaces by using wet or dry sandpaper on a flat surface. The result was much better. These flanges get bent from people tightening down the screws too much, and this repair is something I would recommend to anyone who has their pump out for repair. I had extra springs from other repairs I have done over the years, and there is some variation in the length of the large pump spring. I went ahead and used the old springs 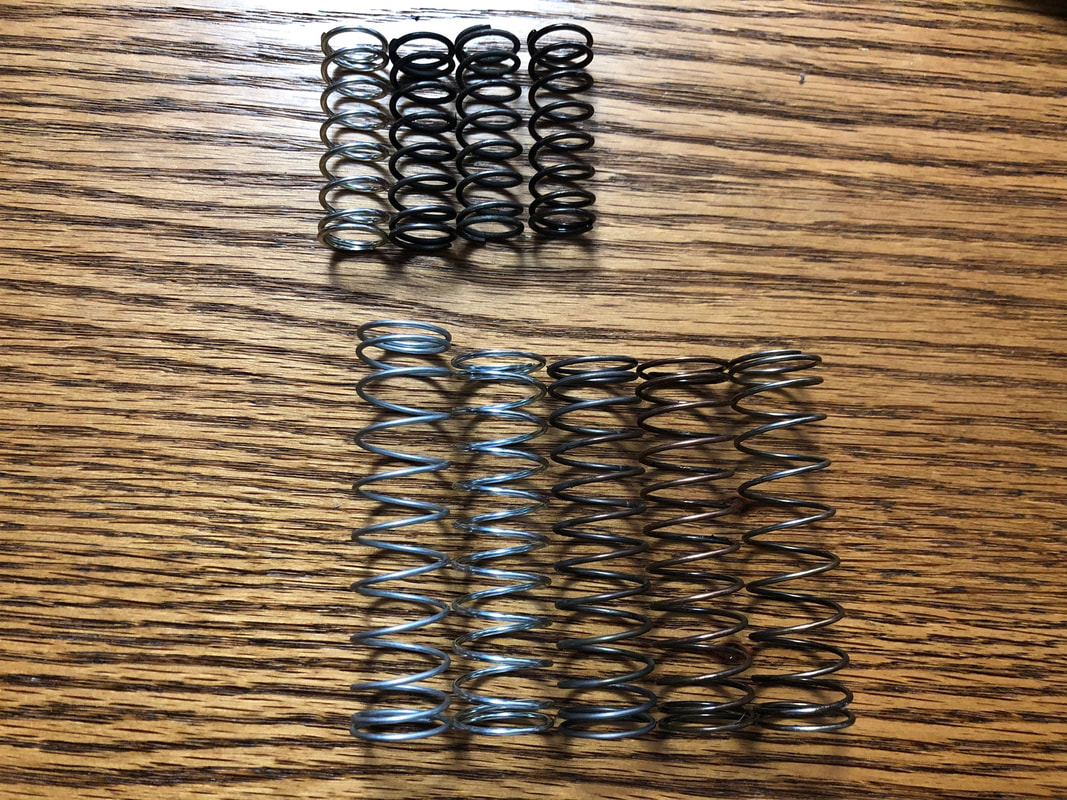 Proceeding on to assembly, one thing that is somewhat tricky is compressing the springs so that the "C" clip can be installed on the end of the push rod. Holding it all together is difficult by hand, and compressing it in a vice covers up the end where the clip needs to go. Rummaging through my junk drawer, I found the perfect thing-- it is from a light fixture where you connect a room light to a junction box. The hole was just the right size to fit over the spring end cap but let the shaft push through. Instead of a vice, I used zip-ties to hold it low enough to install the C clip. 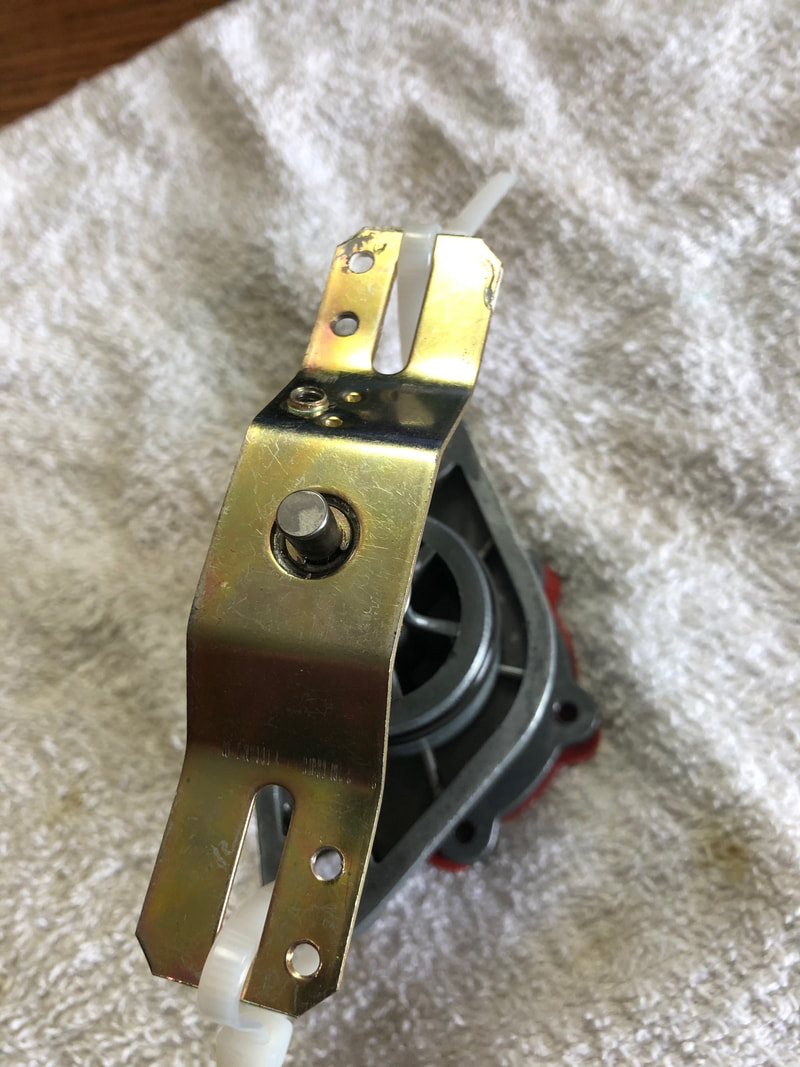 Last step is to make sure the diaphragm is flat when tightening down the screws around the flange of the body. I cut off the zip ties and then used two more to adjust the height of the diaphragm to exactly where I wanted it. Then I installed the upper body while keeping the diaphragm flat. 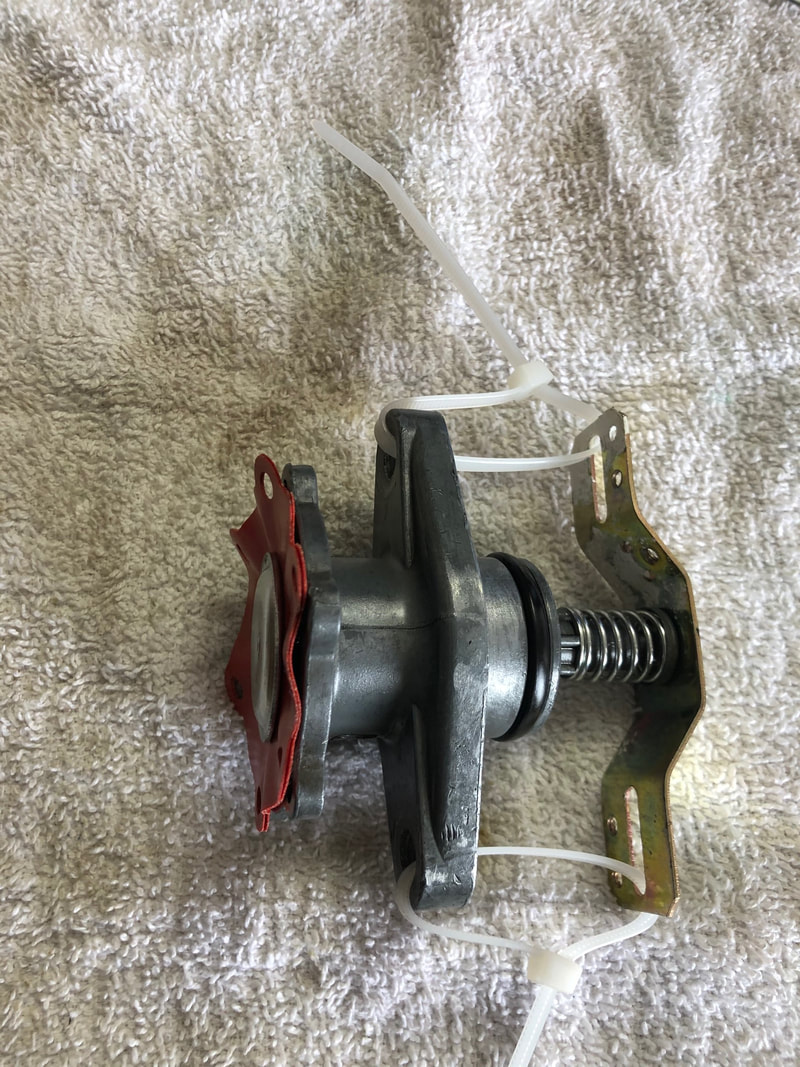 Done! Should be good for miles and miles of pumping fresh fuel to the carbs! 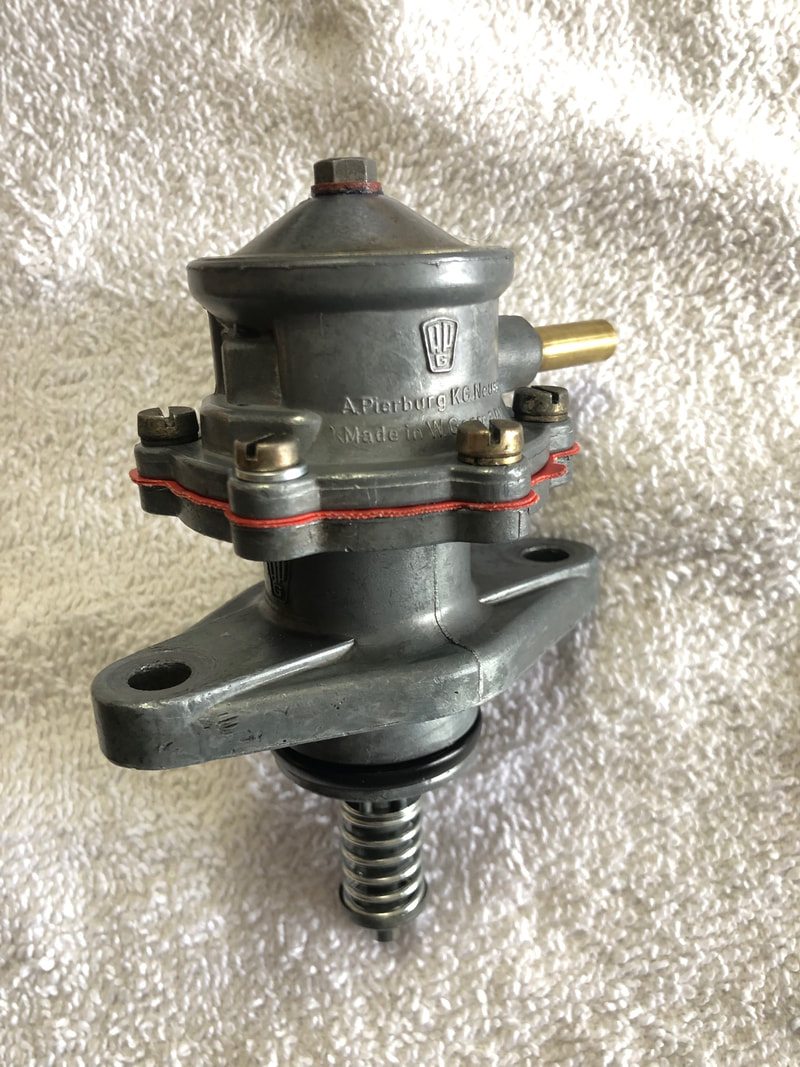 After installing a rebuilt pump, it is a good idea to re-check float levels. Here is a shot of the level in my passenger carb lining up perfectly at Z3 level on my gauge. Right where it should be. Also, if I take the car up to 4k RPM and hold it there while watching the level, it stays right on the line. 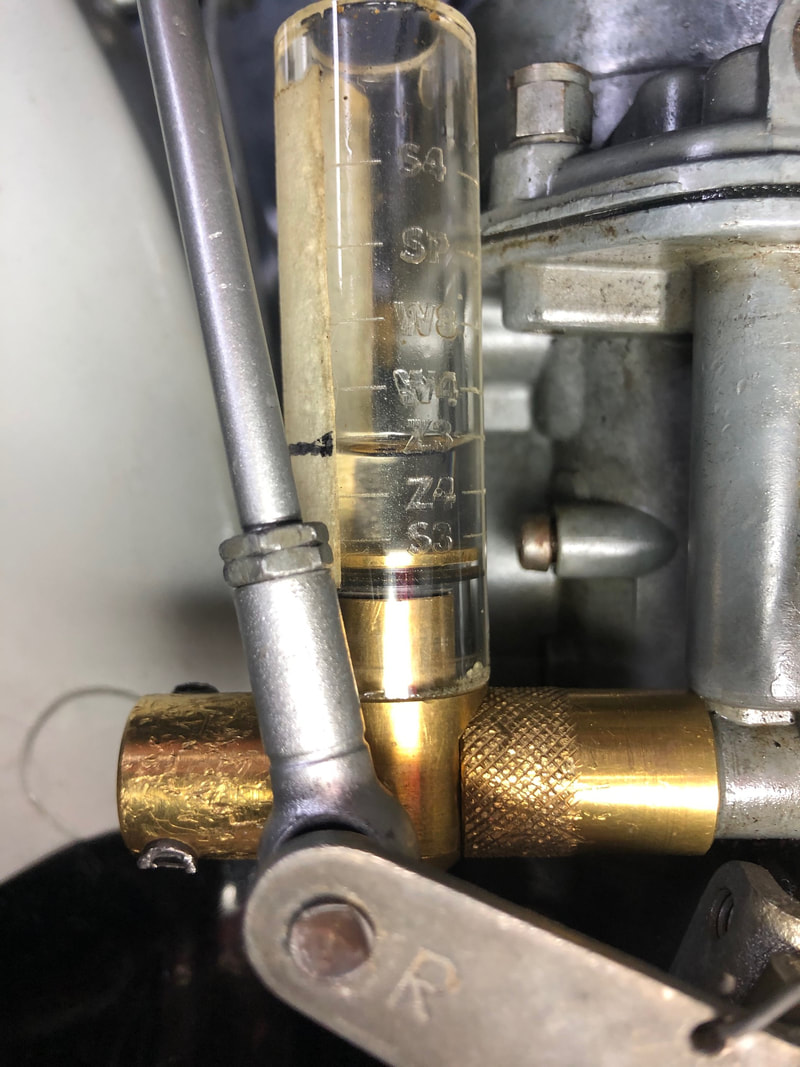 After all the above, a great test drive. Here is a shot taken in THIRD gear. Love it!  Ashes to ashes, but not in this ashtray! The drawing/sketch on this ashtray is my absolute favorite one from the factory! It showed up on some early driver award plaques, salesman binders, Liebe Zu Ihm and other places. Finally PORSCHE commissioned Ulmer Keramic to make this ashtray, along with many other marketing pieces. These are expensive, and this one is pristine. I just think it is wonderful and had to share a photo of it. In the photo of the bookshelf, the large plate on the left is also Ulmer Keramic. You can do a search of my website and find out more about that plate and some matching placemats I have. So happy to finally have tracked down one in this condition and now have it on the shelf!  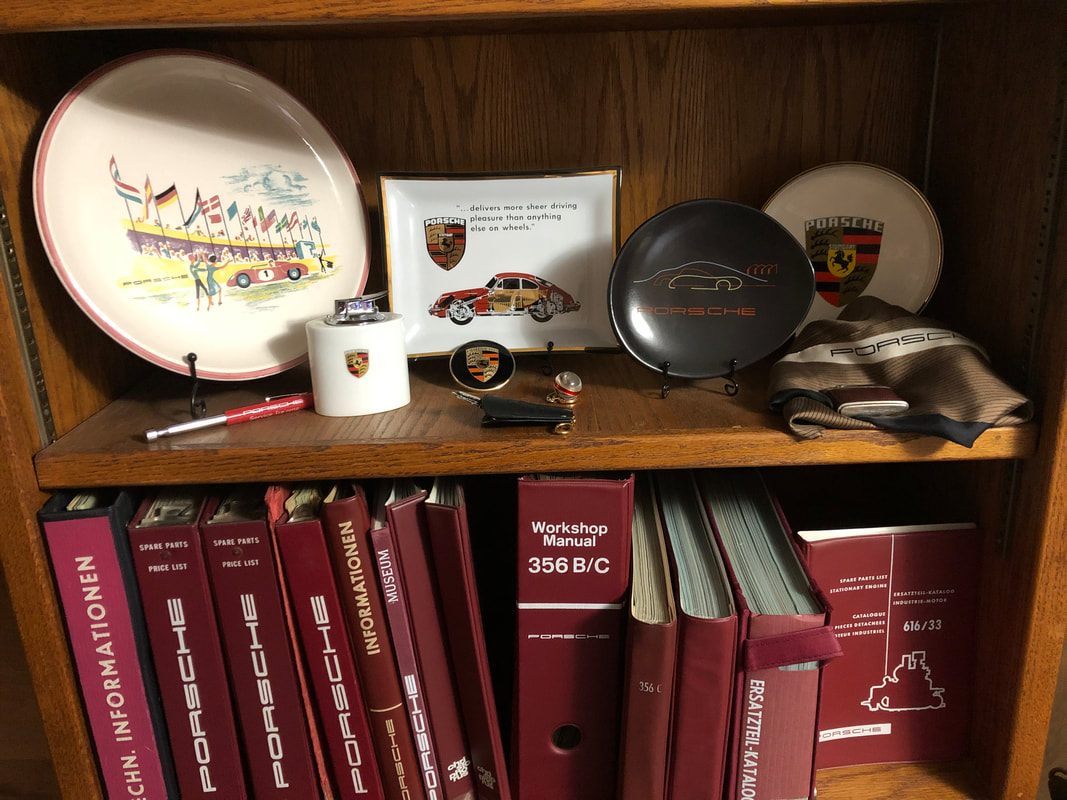 Here is a photo of it with the PORSCHE INFORMATIONEN binder that you see on my shelf. I describe the image as a 356 with wind going over the top, and underneath the 356 is a 550 body. In the background is the roofline of the factory. 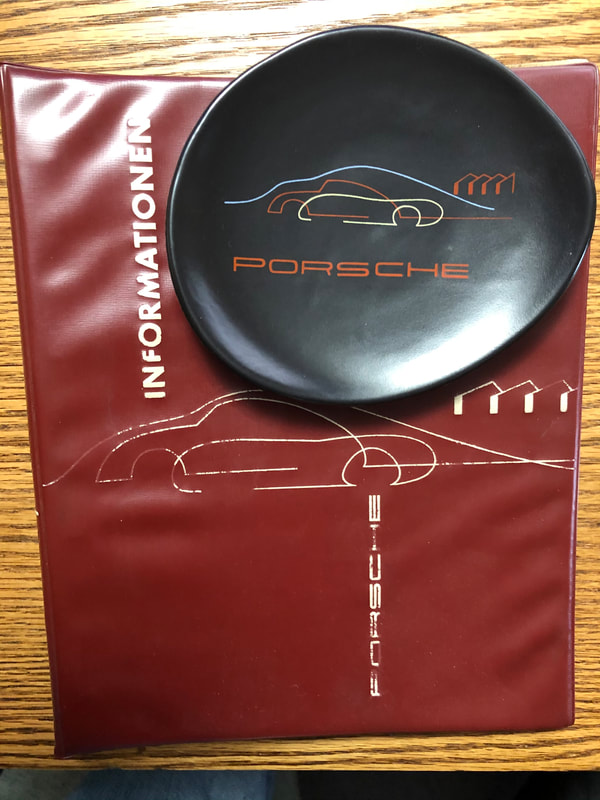 These fun old sports cars are supposed to make us feel happy. They are, after all, a hobby. Well, yesterday I felt cranky about my 356. ALL 660 COLD CRANKING AMPS of crankiness! I bought and installed another new battery for Miss April, replacing one that was only 9 months old. I did this because last Summer I did a bunch of research and web browsing to find out the closest size modern battery to what was original to the car. I believed at the time it should be a 19L battery, which I managed to track down. The battery has 440 CCA (cold cranking amps). Although it would start the car, it was just too sluggish for me. If turning the engine over and deliberately not starting the car so that I could circulate the oil, the revolutions would slow down and just sound tired. Realizing I have not yet installed a starter relay or replaced the starter bushing in the trans, I still was unhappy with the battery. I will get a relay and replace the starter bushing soon, but I want a strong battery I can trust. The solution I chose was to move up to a Group 1 size battery. Fits nicely in the battery area of the T6 battery box, and after removing the modern stickers and attaching a Varta plaque to make it look a bit more like a battery of the period, I'm happy. It's much stronger (50%). I could have chosen an Optima battery (this car came with one) and put it in a plastic box that is made to house them and gotten even better CCA, but I did not want to alter the original plastic battery cover or make any other changes. Photos of my nice strong new battery below. Quite cranky!  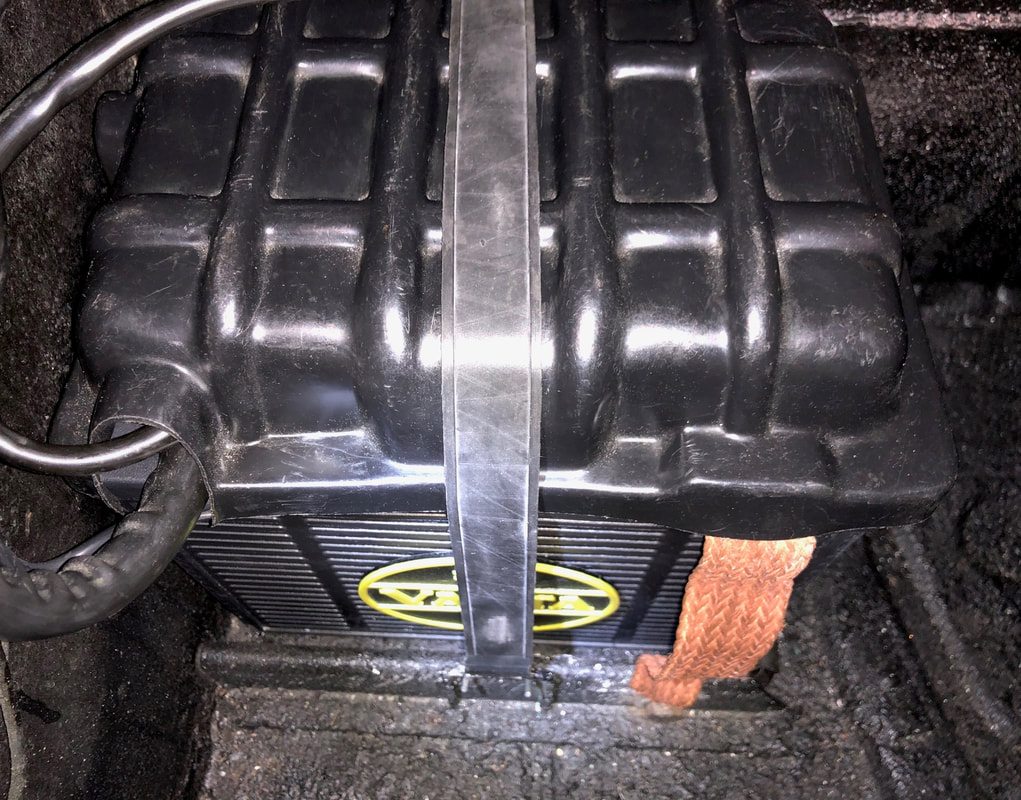 Yes, no doubt about it, Miss April has been retired. Well,,,, re-tired that is. I have been running Vredestein tires on the car and they have aged out. It was well past time to get some new tires for Miss April. Back in November I decided to go with a manufacturer that was making tires during 356 production, and today still provided a vintage looking tread. I decided on Michelin tires. After shopping around, there were none to be found in the correct size and tread, so I ordered them. The shock was that delivery was 3 months for my set of tires. After patiently waiting, they have arrived and Miss April is re-tired again. No doubt I will never wear this set out. I'm very happy with the appearance, and with normal street driving in my future, I am sure the ride will be great. 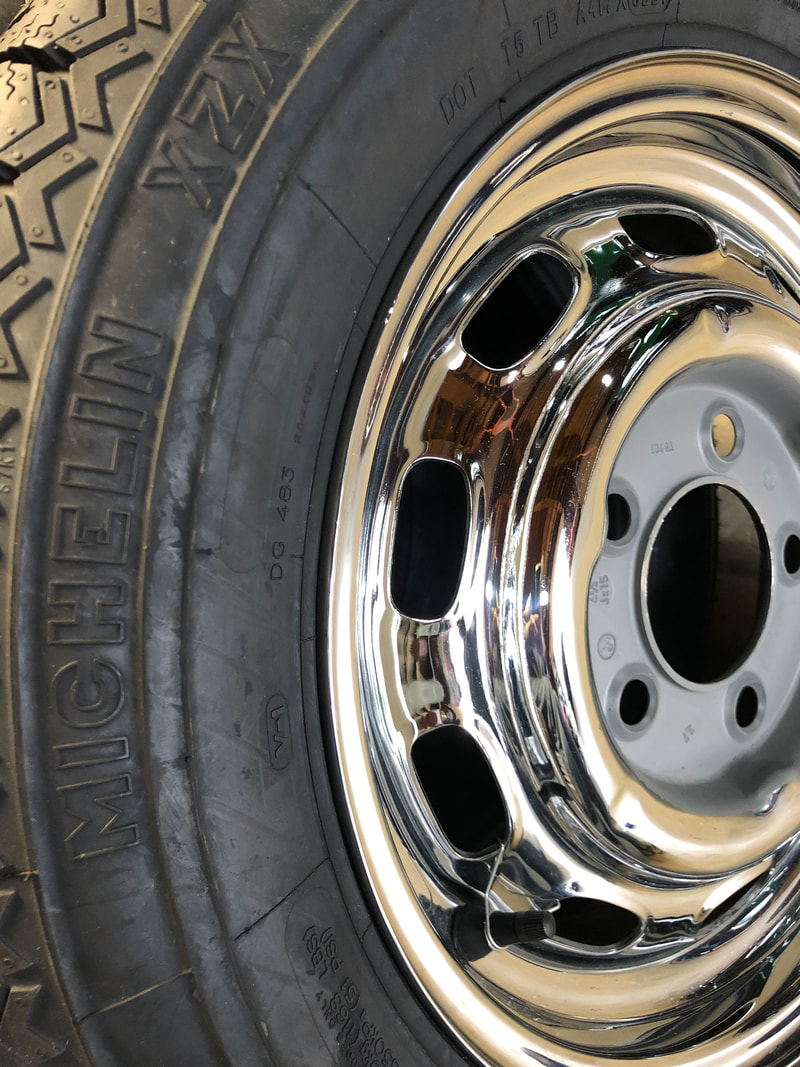 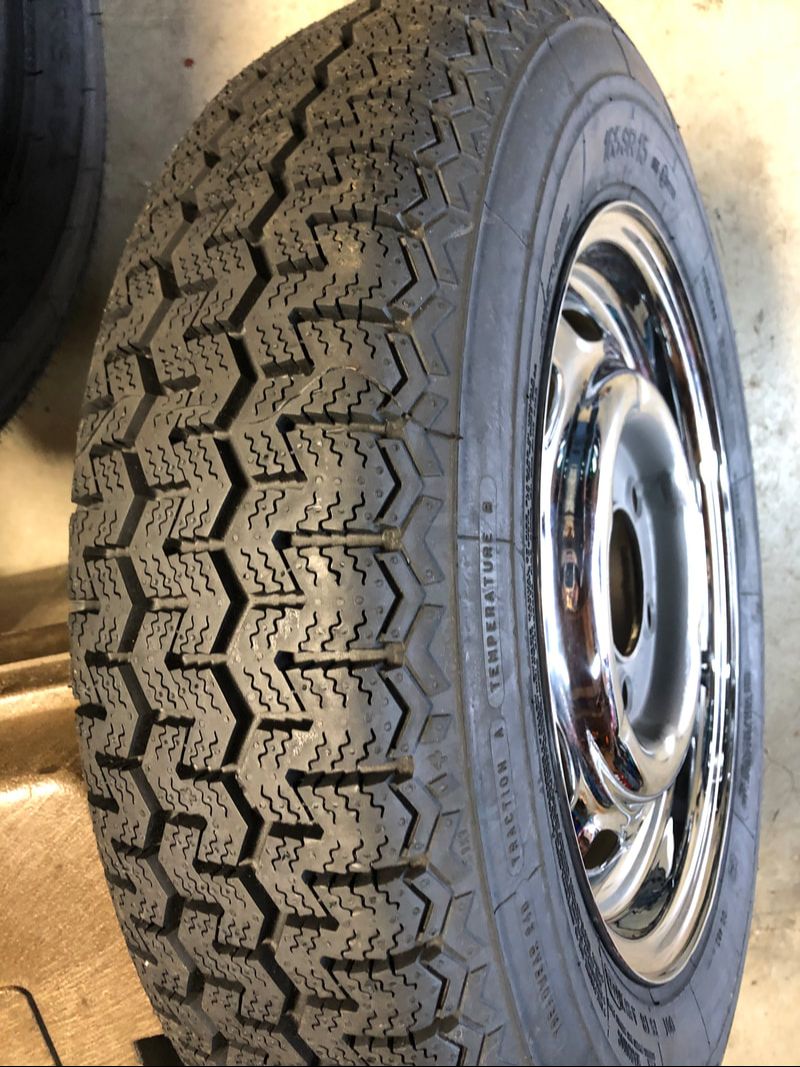 Here on little Whidbey Island Washington it is amazing to me how the population of 356's has grown. I remember thinking 30+ years ago that I had the only one on the island, but I am sure John Brooks had one as well. I believe Tom Olson moved down from Alaska some time later. Fast forward to today, and we can count over 10 356's that are here! Maybe this summer we can get a drive on a sunny day and get some good group photos. I know there was some good group shots taken at a previous Cars & Coffee events but Miss April and I weren't there! I took a few photos on Saturday, but only one came out "ok". There were some nice cars in attendance and you can see the reflection of a Champaign Yellow coupe in the side of Miss April. I am parked next to Tom's car, and that is John looking into the red coupe.  I'm writing this on the coldest day of the year. It's only 13 degrees F. outside, with a high temperature today of 22 degrees. Burrr. Yesterday was similar, but more clouds, giving us about 4 inches of snow. I've said Miss April is not a concours/garage queen, so maybe it was time to get her out to play in the snow? First, here is a shot taken right when I pulled her out of the garage.  It started snowing again almost right after I pulled out of the garage, and quickly dusted the Irish Green paint. 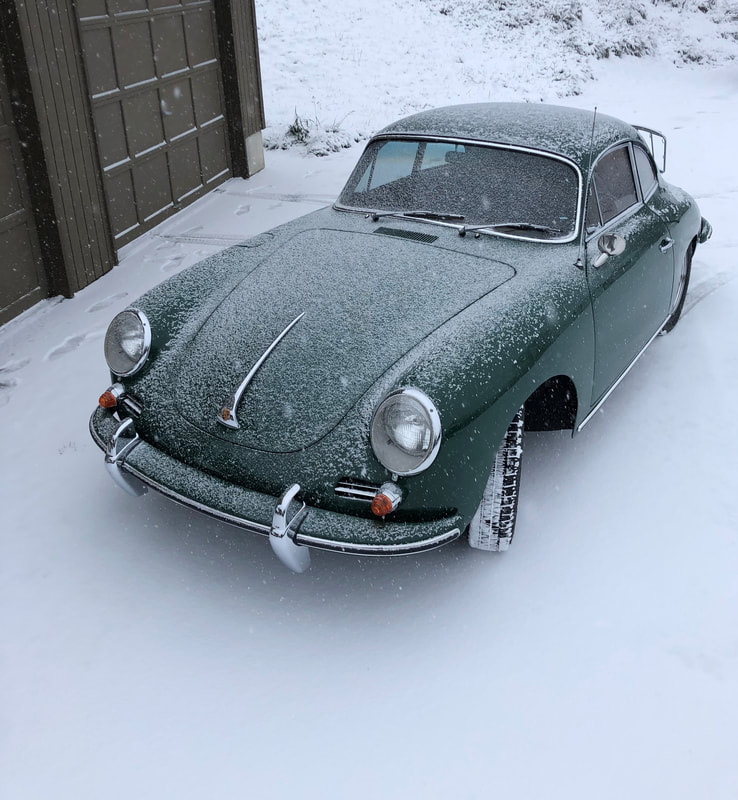 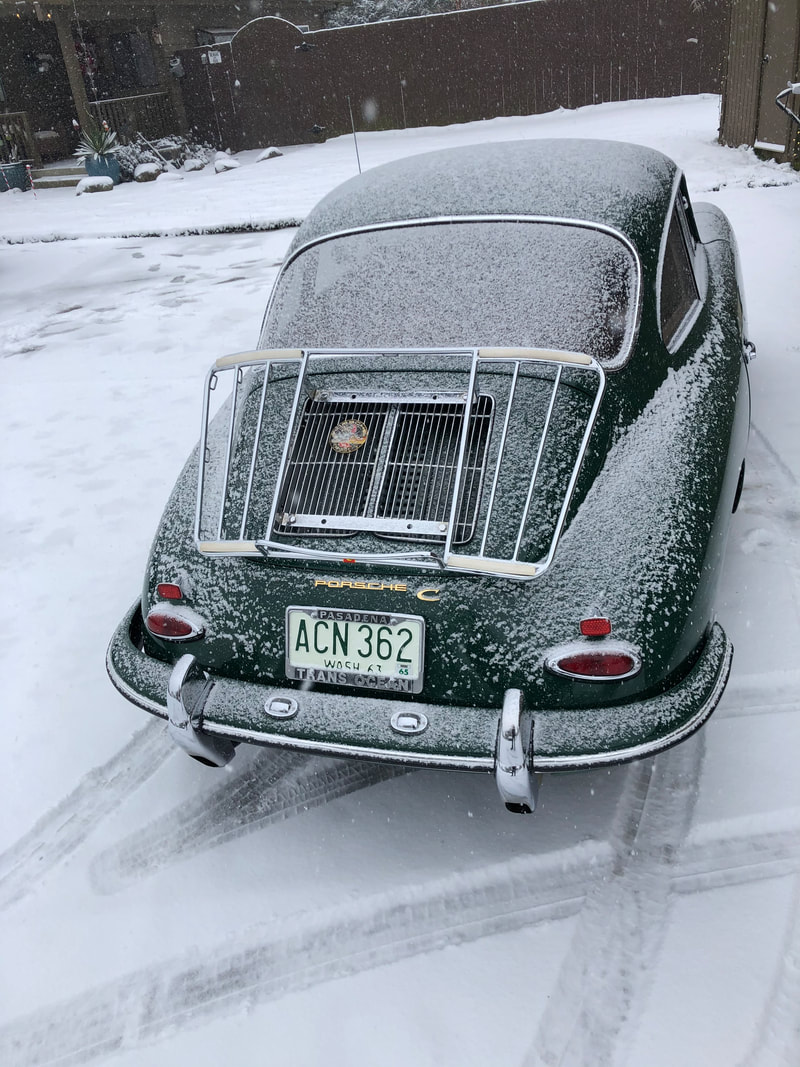 Ok, time to play before it gets to be too much! 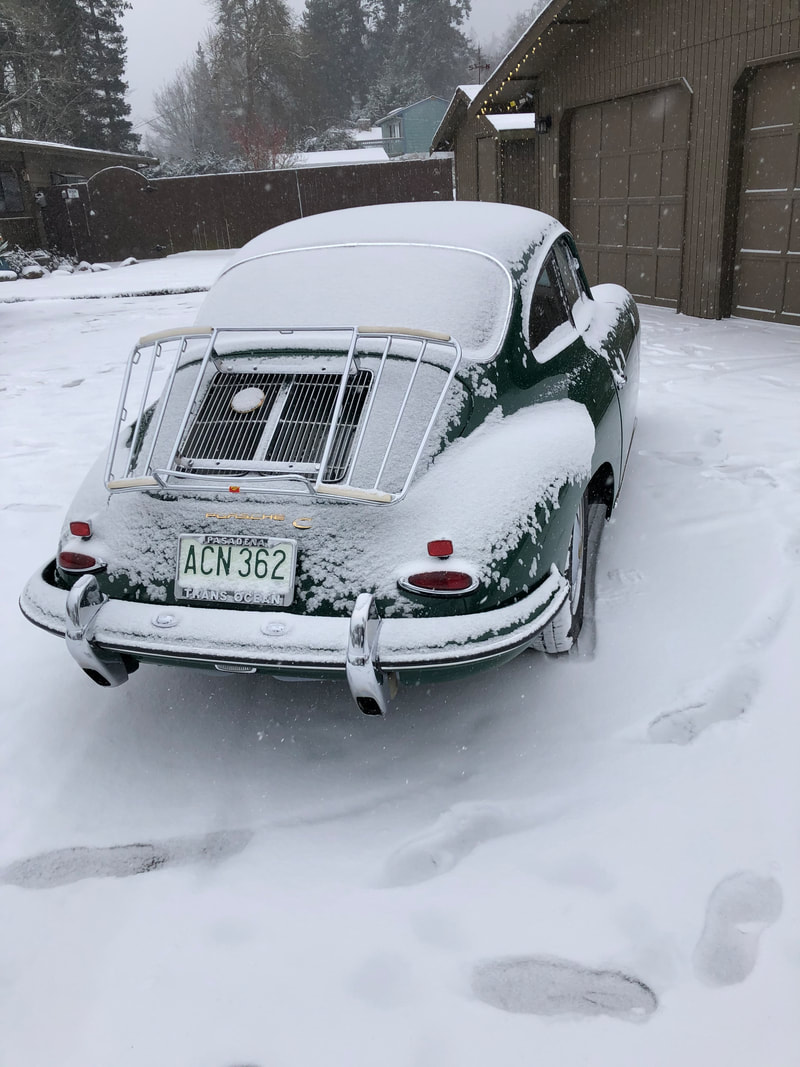 Few more shots of Miss April enjoying play time. 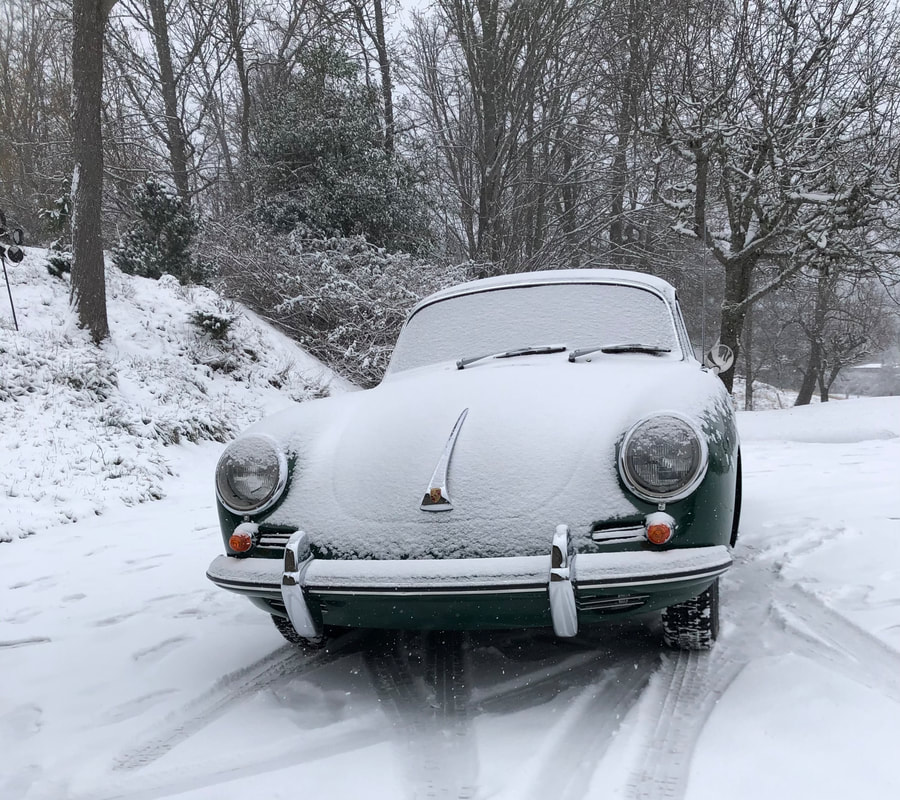 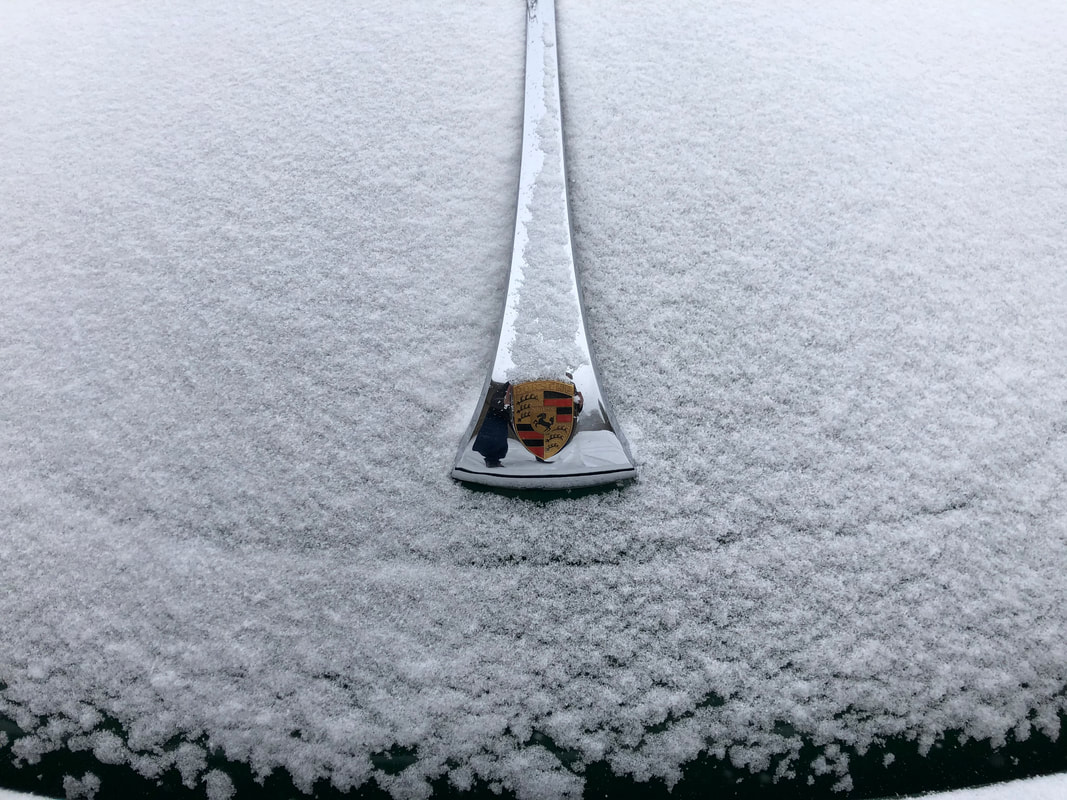 And a closer view..... 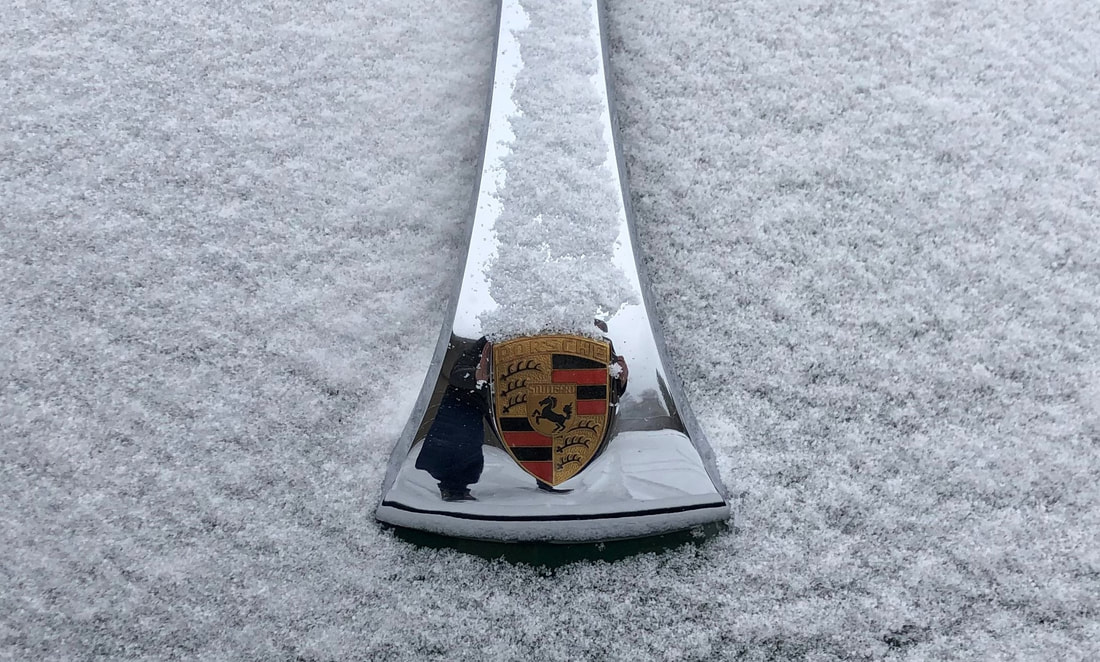 Time to head back into the garage. This was fun! 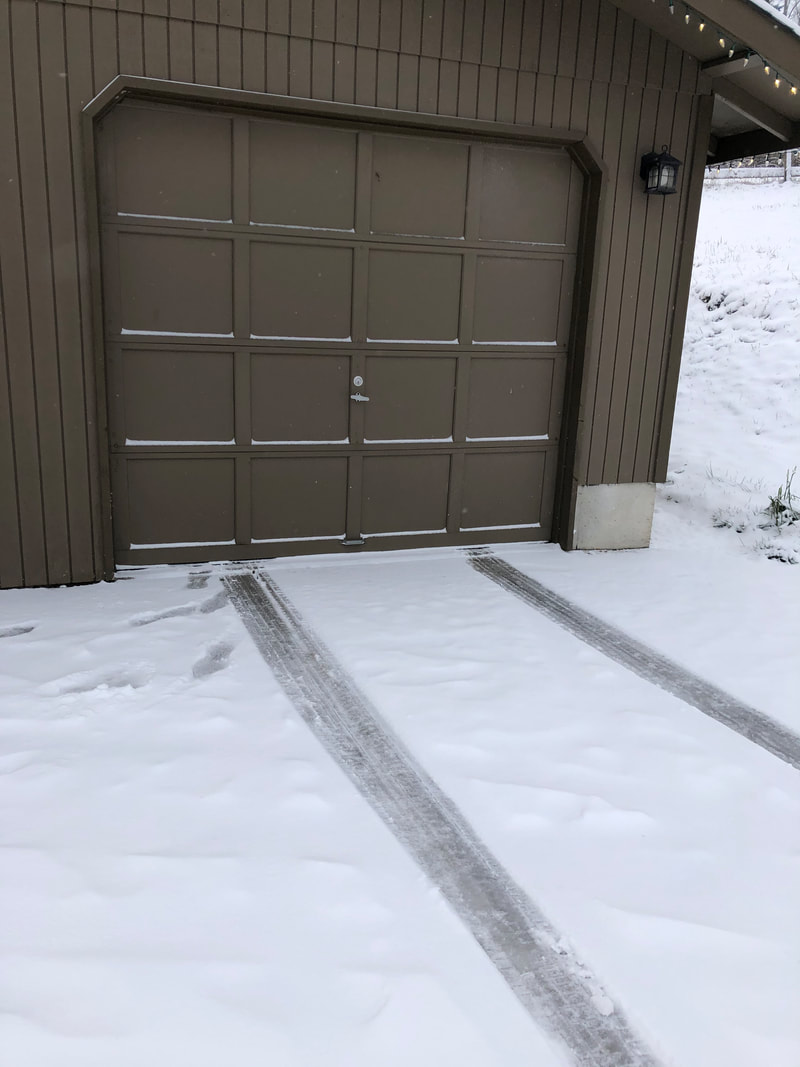 |